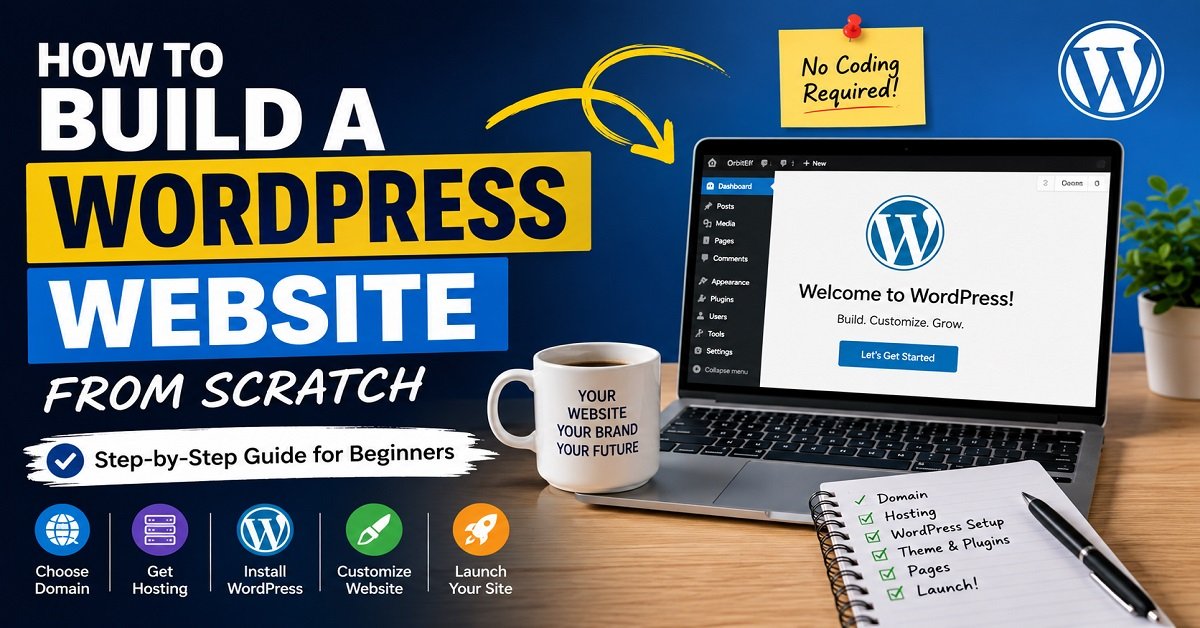
Building a website may seem like something only web developers can do. You might think you need to learn coding, spend thousands of rupees, or hire a professional before your website can go live.
Fortunately, none of that is true today.
Thanks to WordPress, anyone can create a professional-looking website without writing a single line of code. Whether you want to start a blog, launch an online business, create a portfolio, or build a company website, WordPress makes the process much easier than it used to be.
The biggest challenge for beginners isn’t building the website itself. It’s finding a guide that explains everything in the right order. Many tutorials skip important steps or assume you already know technical terms like hosting, DNS, SSL, or plugins.
That’s exactly why this guide exists.
In this beginner-friendly tutorial, you’ll learn how to build a WordPress website from scratch, step by step. We’ll cover everything from choosing a domain name and web hosting to installing WordPress, selecting a theme, creating pages, and publishing your first piece of content.
By the end of this guide, you’ll have a fully functional WordPress website that you can continue improving as your online business grows.
If you’re still deciding what type of website you want to build, read our guide on How to Choose a Blogging Niche That Makes Money before continuing. Choosing the right niche first will make the rest of the process much easier.
What You’ll Need to Build a WordPress Website
The good news is that you don’t need expensive equipment or technical knowledge to build a WordPress website.
Here are the essentials.
A Domain Name
A domain name is your website’s address on the internet.
For example:
- orbitelf.com
- google.com
- wikipedia.org
Choose a name that is short, easy to remember, and closely matches your brand whenever possible.
Web Hosting
Every website needs a place to store its files.
That’s exactly what web hosting does.
Think of it like renting land to build your house. Without hosting, your website simply can’t exist online.
A reliable hosting provider also keeps your website secure, fast, and available to visitors 24/7.
We’ll discuss how to choose the right hosting later in this guide.
A Computer and Internet Connection
Almost any modern laptop or desktop computer will work.
Since most of the setup happens through your web browser, you don’t need powerful hardware.
About One Hour of Your Time
If you’re following this guide from start to finish, most beginners can have their first website running within an hour.
Don’t rush through the steps. Spending a little extra time now can save hours of fixing mistakes later.
Why Build a WordPress Website Instead of Using a Website Builder?
There are dozens of website builders available today, including Wix, Squarespace, Shopify, and many others.
So why do millions of people still choose WordPress?
Because it offers the best combination of flexibility, ownership, and long-term growth.
Some of the biggest reasons include:
- It’s free and open-source.
- You don’t need coding knowledge.
- Thousands of professional themes are available.
- More than 60,000 plugins let you add almost any feature imaginable.
- It’s highly SEO-friendly.
- You fully own your website and your content.
- It works equally well for blogs, business websites, portfolios, online stores, and membership websites.
Perhaps the biggest advantage is that WordPress grows with you.
You can start with a simple blog today and later turn it into an online business, an eCommerce store, a course platform, or a membership website without switching to another system.
WordPress.org vs WordPress.com
One mistake many beginners make is confusing WordPress.org with WordPress.com.
Although they sound similar, they’re very different.
| WordPress.org | WordPress.com |
|---|---|
| Self-hosted | Hosted by WordPress.com |
| Full ownership | Limited control on free plans |
| Install any plugin or theme | Restrictions on lower-tier plans |
| Best for long-term growth | Better suited for hobby websites |
| Recommended by OrbitElf | Not our primary recommendation |
Throughout this guide, we’re talking about WordPress.org, the self-hosted version that gives you complete control over your website.
Step 1: Choose the Right Domain Name
Your domain name is one of the first things visitors notice about your website.
A good domain builds trust, improves brand recognition, and is easier for people to remember.
Here are some simple tips for choosing one:
- Keep it short and easy to spell.
- Avoid numbers and hyphens whenever possible.
- Choose something that reflects your niche or brand.
- Make it easy to pronounce.
- Prefer a .com domain if it’s available.
For example, OrbitElf.com is short, memorable, and clearly represents the brand.
On the other hand, something like:
best-online-blogging-guide-2026-site.com
is much harder to remember and doesn’t create a strong brand identity.
Should You Use Keywords in Your Domain Name?
Years ago, websites often ranked well simply because their domain contained exact keywords.
Today, search engines focus much more on content quality than on keyword-stuffed domain names.
Instead of forcing keywords into your domain, choose a name that’s easy to remember and can grow with your business.
For example, names like Google, Amazon, and YouTube don’t describe everything those companies do, yet they’ve become some of the strongest brands in the world.
A memorable brand usually has much more long-term value than an exact-match keyword domain.
Step 2: Choose the Right Web Hosting
After selecting your domain name, the next step is choosing a reliable web hosting provider.
Think of web hosting as the land where your website is built.
Your domain name is the address, but your hosting stores all of your website’s files, images, pages, and databases. Whenever someone visits your website, the hosting server delivers those files to their browser.
Without web hosting, your website can’t be accessed online.
What Makes a Good Web Hosting Provider?
Not all hosting companies offer the same level of service.
A good hosting provider should give you:
- Fast website loading speeds
- Excellent uptime (99.9% or higher)
- Free SSL certificate
- One-click WordPress installation
- Regular backups
- Responsive customer support
- Easy upgrade options as your website grows
Choosing a reliable host from the beginning can save you many headaches later.
Types of Web Hosting
You’ll come across several different hosting options while researching. Here’s a simple overview.
Shared Hosting
Shared hosting is the best choice for beginners.
Your website shares a server with other websites, which keeps the cost low.
Pros
- Affordable
- Beginner-friendly
- Easy to manage
- Perfect for new blogs and small business websites
Cons
- Resources are shared with other websites
- Performance may decrease if your traffic grows significantly
For most beginners, shared hosting is more than enough during the first year.
Managed WordPress Hosting
Managed WordPress hosting is specifically designed for WordPress websites.
The hosting company handles updates, security, backups, and many technical tasks for you.
Pros
- Excellent performance
- Better security
- Automatic updates
- Expert WordPress support
Cons
- Higher monthly cost
This option is ideal once your website starts receiving consistent traffic.
VPS Hosting
A Virtual Private Server (VPS) gives you dedicated resources without paying for an entire physical server.
It offers much more flexibility and power than shared hosting.
However, it usually requires more technical knowledge.
Unless you’re running a high-traffic website, you probably won’t need VPS hosting when starting out.
Dedicated Server
With a dedicated server, your website uses an entire physical server.
This option provides maximum performance and complete control.
However, it’s expensive and generally used by large businesses, popular websites, or applications with heavy traffic.
Most beginners can safely ignore this option.
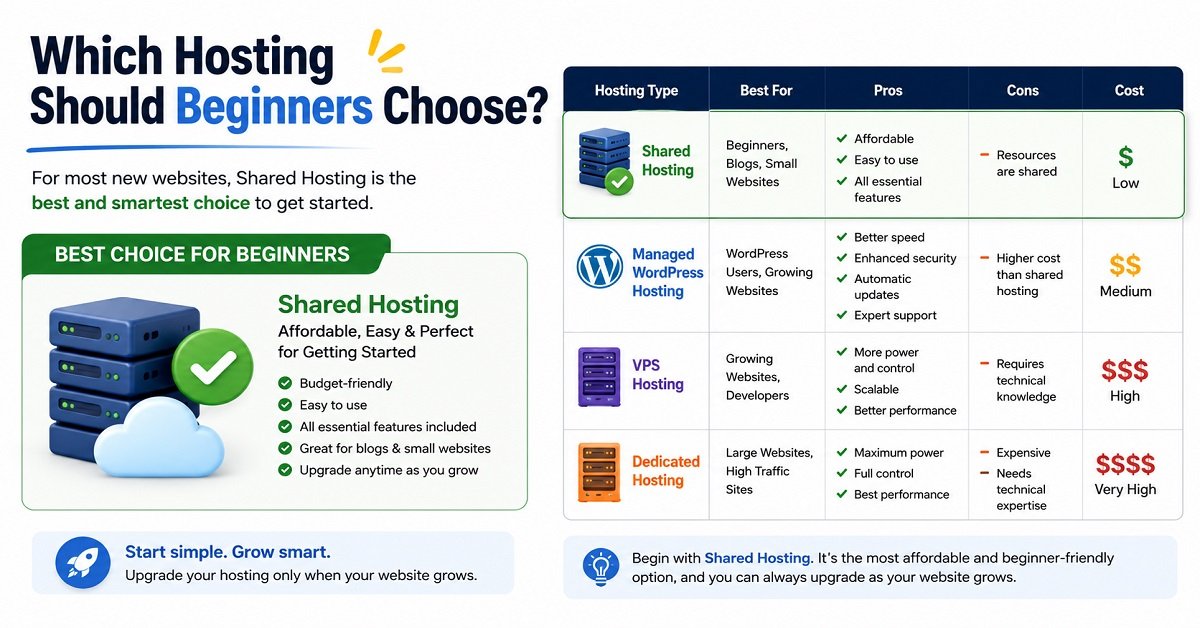
Which Hosting Should Beginners Choose?
For your first website, shared hosting is usually the smartest choice.
It’s affordable, easy to use, and provides everything you need to launch your website successfully.
As your website grows and starts attracting more visitors, you can always upgrade to a more powerful hosting plan later.
Starting simple allows you to focus on creating valuable content instead of worrying about technical details.
Step 3: Register Your Domain Name
Once you’ve selected a hosting provider, you’ll usually register your domain name during the signup process.
Many hosting companies include a free domain name for the first year with their hosting plans, making the process simple for beginners.
If your preferred domain is available, register it immediately.
Good domain names are taken every day, so delaying your decision could mean someone else registers the name you wanted.
After purchasing your hosting plan and domain, your hosting provider will connect everything automatically in most cases.
From there, you’re ready to install WordPress.
Step 4: Install WordPress
Years ago, installing WordPress required uploading files manually, creating databases, and editing configuration files.
Thankfully, those days are long gone.
Today, nearly every reputable hosting company offers one-click WordPress installation.
The exact steps vary slightly depending on your hosting provider, but the overall process is very similar.
Typically, you’ll:
- Log in to your hosting account.
- Open the control panel.
- Find the WordPress Installer or Auto Installer.
- Select your domain name.
- Create your administrator username and password.
- Click Install.
That’s it.
Within a few minutes, your new WordPress website will be ready.
You’ll receive two important URLs:
Your website
https://yourdomain.comYour WordPress Dashboard
https://yourdomain.com/wp-adminSave your login details somewhere safe because you’ll use them frequently while managing your website.
Step 5: Get Familiar with the WordPress Dashboard
After logging in for the first time, you’ll see the WordPress Dashboard.
At first glance, it may look overwhelming.
The good news is that you’ll only use a handful of sections regularly.
Let’s look at the most important ones.
Posts
This is where you’ll write blog articles.
Every new blog post you publish is created here.
Pages
Pages are different from posts.
You’ll use them for static content such as:
- About
- Contact
- Privacy Policy
- Disclaimer
- Affiliate Disclosure
Unlike blog posts, pages don’t appear in chronological order.
Media
Every image, PDF, logo, or video you upload is stored in the Media Library.
Keeping your media organized makes managing your website much easier.
Appearance
This section controls how your website looks.
Here you can:
- Install themes
- Customize colors
- Create menus
- Manage widgets
- Adjust layouts
Changing your theme completely changes your website’s design without affecting your content.
Plugins
Plugins add new features to your website.
For example, you can install plugins to:
- Improve SEO
- Speed up your website
- Create contact forms
- Add security
- Back up your website
- Build image galleries
Think of plugins as apps for your WordPress website.
Settings
The Settings menu controls many important options, including:
- Site title
- Time zone
- Date format
- Permalinks
- Reading settings
- Discussion settings
We’ll configure these settings later in this guide.
Don’t Worry About Learning Everything at Once
One of the biggest mistakes beginners make is trying to understand every option inside WordPress before building their website.
You don’t need to master everything immediately.
Instead, learn one feature at a time as you need it.
Within a few weeks of publishing content, navigating the WordPress dashboard will feel completely natural.
Step 6: Choose the Right Theme to Build a WordPress Website
Now that WordPress is installed, it’s time to choose how your website will look.
This is where WordPress themes come in.
A theme controls your website’s:
- Layout
- Colors
- Typography
- Header and footer
- Blog design
- Overall appearance
The good news is that you can change your theme later without losing your content.
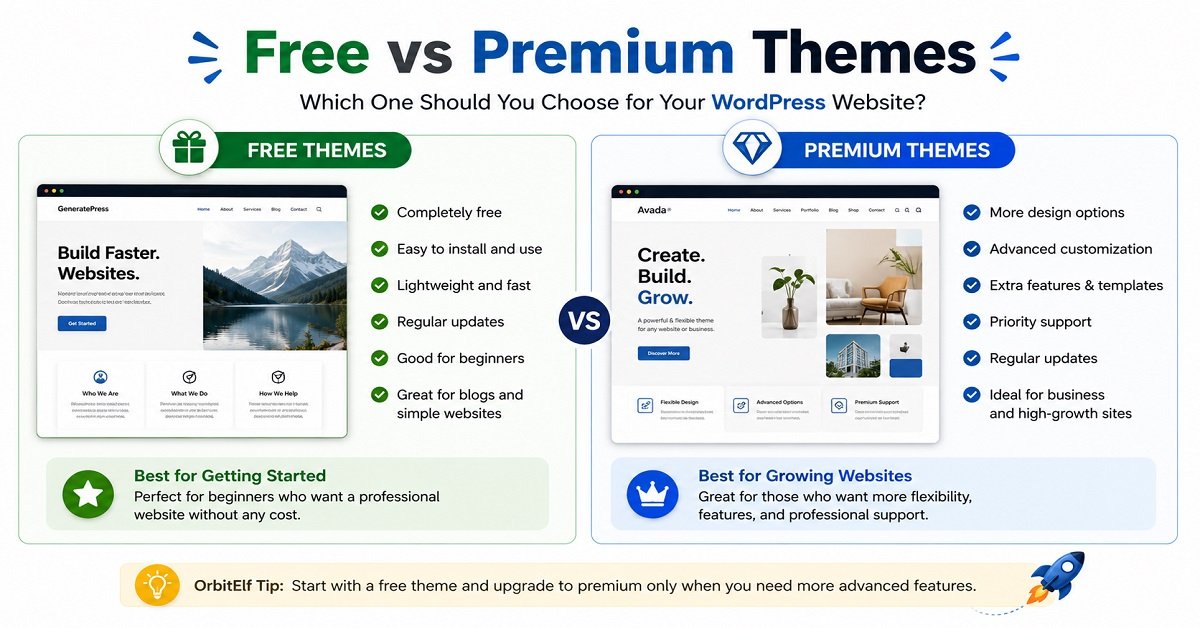
Free vs Premium Themes
One of the first decisions you’ll face is whether to use a free or premium theme.
Free Themes
Free themes are perfect when you’re just getting started.
Many of them are professionally designed, lightweight, and receive regular updates.
Popular free themes include:
- GeneratePress
- Astra
- Kadence
- Blocksy
These themes are trusted by millions of WordPress users.
For beginners, a quality free theme is more than enough.
Premium Themes
Premium themes usually include:
- More customization options
- Extra layouts
- Premium support
- Additional starter templates
- Advanced design features
If you’re building a business website or want more design flexibility, upgrading later can be worthwhile.
You don’t need to spend money on a premium theme on day one.
Focus on creating great content first.
What We Recommend
At OrbitElf, we recommend choosing a theme that is:
- Fast
- Mobile-friendly
- Regularly updated
- SEO-friendly
- Easy to customize
- Compatible with popular plugins
Avoid themes packed with unnecessary animations or features you don’t need.
A lightweight website almost always performs better than a flashy one.
Step 7: Install Essential WordPress Plugins
Plugins add new features to your website.
Just like apps on your smartphone, plugins allow WordPress to do much more than its default installation.
However, beginners often make one big mistake.
They install too many plugins.
More plugins don’t automatically make your website better.
Instead, install only the plugins you actually need.
Plugins Every Beginner Should Consider
SEO Plugin
An SEO plugin helps search engines understand your content.
It can assist with:
- Meta titles
- Meta descriptions
- XML sitemaps
- Schema markup
- Readability suggestions
A good SEO plugin won’t magically rank your website, but it helps you follow SEO best practices.
Caching Plugin
Website speed matters.
A caching plugin stores optimized versions of your pages, helping them load much faster.
Faster websites usually provide a better user experience.
Security Plugin
Hackers don’t only target large websites.
Even new websites can experience login attacks and spam.
A security plugin helps protect your website by adding an extra layer of defense.
Backup Plugin
Imagine spending months writing articles only to lose everything because of a server issue.
Backups prevent disasters like that.
A backup plugin allows you to restore your website if something goes wrong.
Contact Form Plugin
Every professional website should have a contact page.
A contact form plugin allows visitors to send messages without exposing your email address publicly.
Image Optimization Plugin
Large images can slow down your website.
Image optimization plugins automatically compress images while maintaining good quality.
This improves loading speed and user experience.
Only Install Trusted Plugins
Before installing any plugin, check:
- Number of active installations
- Recent updates
- User ratings
- Developer reputation
If a plugin hasn’t been updated in years, it’s usually better to avoid it.
Step 8: Create the Essential Pages
Before publishing your first blog post, create the pages that every professional website should have.
These pages help visitors trust your website.
They also demonstrate transparency to search engines.
About Page
Your About page tells visitors:
- Who you are
- Why you started the website
- What readers will learn
- How you can help them
People trust people.
A good About page helps build that trust.
Contact Page
Give readers a simple way to contact you.
Your Contact page can include:
- Contact form
- Business email
- Response expectations
Even if you don’t expect many messages initially, having a contact page makes your website look more professional.
Privacy Policy
If your website collects visitor information through analytics, cookies, newsletters, or contact forms, you should have a Privacy Policy.
Most hosting companies and WordPress plugins make adding one very easy.
Disclaimer
A disclaimer explains the limitations of your content.
For example, if your website shares educational information, tutorials, or opinions, a disclaimer helps clarify that readers remain responsible for their own decisions.
Affiliate Disclosure
If you plan to earn money through affiliate marketing, you should clearly tell readers.
Being transparent builds trust.
It also helps comply with affiliate program requirements.
Terms and Conditions
Although not mandatory for every website, Terms and Conditions explain how visitors may use your website and content.
As your website grows, having this page becomes increasingly valuable.
Additional Trust Pages
Here at OrbitElf, we’ve also published:
- Editorial Policy
- AI Usage Policy
These pages explain how we create content and when AI is used during our writing process.
Although not required for every new website, they strengthen transparency and support Google’s E-E-A-T principles.
Step 9: Configure Important WordPress Settings
Your website is almost ready.
Before publishing your first article, spend a few minutes reviewing your WordPress settings.
These small adjustments can prevent bigger problems later.
Change the Site Title and Tagline
Go to:
Settings → General
Add:
- Website Name
- Tagline
For example:
Site Title
OrbitElfTagline
Learn. Build. Grow Online.This information appears in several places, including search engines.
Set Your Time Zone
Still under Settings → General, choose your local time zone.
This ensures your blog posts publish at the correct time.
Configure Permalinks
Go to:
Settings → Permalinks
Select:
Post Name
Your URLs will look like this:
yourdomain.com/how-to-start-a-blogInstead of:
yourdomain.com/?p=123Short, descriptive URLs are much easier for both readers and search engines.
Delete Default Content
WordPress installs:
- Sample Page
- Hello World post
- Default comment
Delete these before launching your website.
They don’t provide any value and look unprofessional.
Adjust Discussion Settings
Visit:
Settings → Discussion
Here you can decide whether visitors can leave comments on your articles.
If you enable comments, remember to moderate them regularly to reduce spam.
Check Reading Settings
Go to:
Settings → Reading
Make sure your homepage is configured the way you want.
Many bloggers later switch from displaying recent posts to using a custom homepage.
Upload Your Logo and Site Icon
Under:
Appearance → Customize
or
Appearance → Editor
Upload:
- Website logo
- Site icon (favicon)
The favicon is the small icon visitors see in browser tabs.
It’s a small detail that makes your website look more polished.
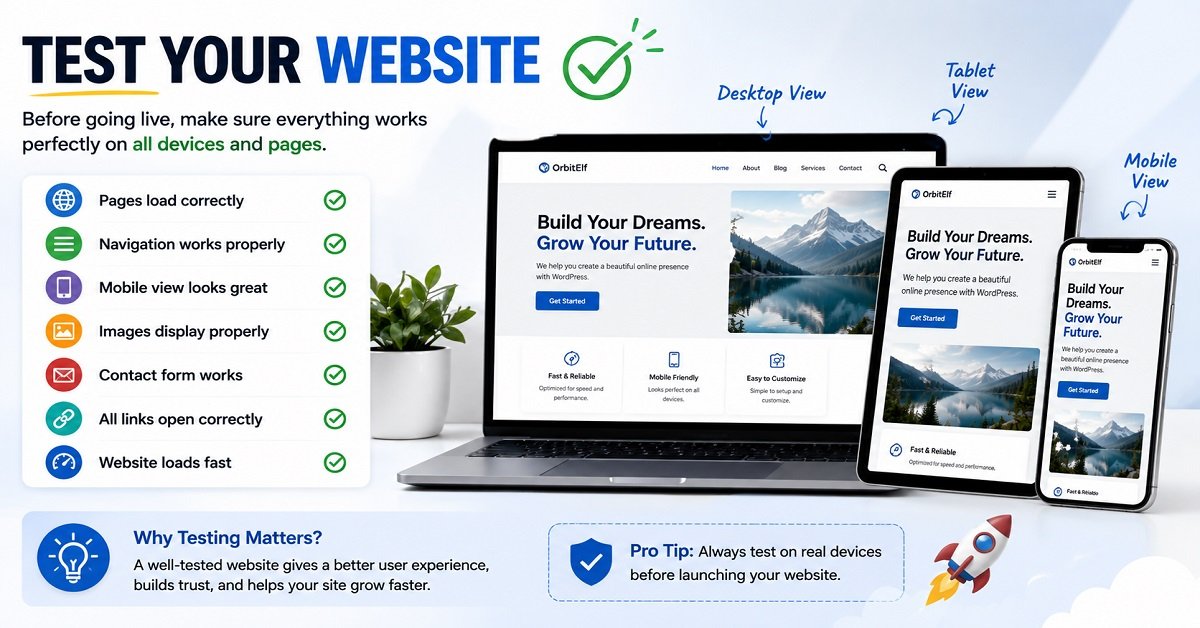
Test Your Website
Before writing your first article, spend a few minutes checking your website.
Visit it on:
- Desktop
- Mobile phone
- Tablet
Check that:
- Pages load correctly
- Navigation works
- Images display properly
- Contact form works
- Footer links open correctly
Finding small issues now is much easier than after you’ve published dozens of articles.
Step 10: Publish Your First Blog Post
Congratulations!
By now, you’ve built the foundation of your WordPress website.
The next step is publishing your first piece of content.
Don’t worry about making it perfect.
Every successful blogger started with a first article.
Creating Your First Post
In your WordPress dashboard, go to:
Posts → Add New
You’ll see the WordPress Block Editor, where you can create your content using blocks for headings, paragraphs, images, lists, tables, buttons, and more.
Before publishing, make sure your article includes:
- A clear title
- Helpful introduction
- Headings (H2 and H3)
- Relevant images
- Internal and external links
- Categories
- Tags
- Featured image
- Meta title and meta description
Publishing consistently is much more important than waiting for perfection.
OrbitElf Tip: If you haven’t already, read our complete guide on How to Start a Blog in 2026. It explains how to plan content, write helpful articles, and build your blog for long-term success.
Step 11: Make Your Website Mobile-Friendly
Today, most people browse websites using smartphones.
That’s why your website should look great on every screen size.
Fortunately, most modern WordPress themes are responsive by default.
Still, take a few minutes to check your website on:
- Mobile phone
- Tablet
- Desktop
Make sure:
- Text is easy to read.
- Buttons are large enough to tap.
- Images display correctly.
- Menus work properly.
- Nothing looks broken.
A good mobile experience keeps visitors engaged and improves user satisfaction.
Step 12: Improve Your Website Speed
Website speed is important for both visitors and search engines.
People don’t enjoy waiting for slow pages to load.
Here are a few simple ways to improve performance:
- Use lightweight themes.
- Compress images before uploading.
- Install a caching plugin.
- Choose reliable hosting.
- Remove unnecessary plugins.
- Keep WordPress updated.
Don’t chase perfect speed scores.
Instead, focus on giving visitors a fast and smooth browsing experience.
Step 13: Secure Your WordPress Website
Security is something many beginners ignore until something goes wrong.
Protecting your website from the beginning is much easier than recovering from an attack later.
Here are some basic security practices:
- Use strong passwords.
- Enable two-factor authentication if available.
- Keep WordPress updated.
- Update themes and plugins regularly.
- Install a trusted security plugin.
- Create regular backups.
- Delete plugins and themes you no longer use.
These simple habits can prevent many common security issues.
Step 14: Connect Google Search Console and Google Analytics
Once your website is live, you’ll want to know how it’s performing.
Two free tools from Google can help.
Google Search Console
Search Console helps you understand how your website appears in Google Search.
You can:
- Submit your sitemap.
- Monitor indexing.
- Track keyword performance.
- Find technical issues.
- See which pages receive clicks.
It’s one of the most valuable tools for website owners.
Google Analytics
Google Analytics helps you understand your visitors.
You can see:
- How many people visit your website.
- Which pages are most popular.
- Where visitors come from.
- How long they stay.
- Which devices they use.
This information helps you improve your website over time.
Common Mistakes Beginners Make
Building a WordPress website is easier than ever, but beginners still make a few common mistakes.
Avoiding these will save you time and frustration.
Buying Expensive Tools Immediately
Many new website owners believe they need premium themes and expensive plugins before publishing.
You don’t.
Start with reliable free tools and upgrade only when your website genuinely needs additional features.
Installing Too Many Plugins
More plugins don’t always make your website better.
Install only the plugins that provide real value.
Unused plugins should be removed.
Ignoring Website Backups
Even reliable websites can experience unexpected problems.
Regular backups ensure you can quickly restore your website if something goes wrong.
Forgetting Basic SEO
Publishing great content is important.
Helping search engines understand that content is equally important.
Take time to learn basic SEO as your website grows.
Constantly Changing Themes
Many beginners keep switching themes every few weeks.
This wastes valuable time.
Choose a lightweight theme, customize it, and focus on publishing helpful content instead.
Waiting for Everything to Be Perfect
Perfection delays progress.
Launch your website.
Publish your first article.
Improve as you learn.
That’s how successful websites are built.
How to Build a WordPress Website: Final Launch Checklist
Before announcing your new website, go through this checklist.
✔ Purchased hosting
✔ Registered your domain
✔ Installed WordPress
✔ Selected a lightweight theme
✔ Installed essential plugins
✔ Created your About page
✔ Created your Contact page
✔ Added Privacy Policy
✔ Added Disclaimer
✔ Added Affiliate Disclosure
✔ Added Terms and Conditions
✔ Published your first article
✔ Connected Google Search Console
✔ Connected Google Analytics
✔ Tested your website on mobile devices
✔ Created regular backups
If you’ve completed everything above, your website is ready for visitors.
Pros and Cons of WordPress
Pros
- Free and open-source
- Beginner-friendly
- No coding required
- Highly customizable
- Thousands of themes and plugins
- Excellent SEO capabilities
- Large community and documentation
- Suitable for almost any type of website
Cons
- Requires regular updates
- Plugin conflicts can occasionally occur
- Beginners may need time to learn the dashboard
- Choosing from thousands of themes and plugins can feel overwhelming
Fortunately, these challenges become much easier with experience.
Frequently Asked Questions
Is WordPress free?
Yes.
WordPress itself is free to download and use.
However, you’ll usually pay for web hosting and a domain name to make your website available online.
Can I build a WordPress website without coding?
Absolutely.
Modern WordPress themes and plugins allow you to create professional websites without writing code.
How much does it cost to build a WordPress website?
The cost depends on your hosting provider, domain registration, and whether you purchase premium themes or plugins.
Many beginners launch their first website with a relatively small investment.
How long does it take to build a WordPress website?
Most beginners can build a basic website within one to two hours.
Improving the website with helpful content is an ongoing process.
Can I change my theme later?
Yes.
You can switch themes at any time.
Your content remains intact, although some design settings may need adjustment.
Is WordPress good for SEO?
Yes.
WordPress provides an excellent foundation for SEO when combined with quality content, a fast website, and proper optimization.
Can I make money with a WordPress website?
Yes.
Many website owners earn income through:
Affiliate marketing
Display advertising
Selling digital products
Offering services
Sponsored content
Success depends on consistently creating helpful content and building trust with your audience.
Is WordPress secure?
Yes, when properly maintained.
Keeping WordPress, themes, and plugins updated while following basic security practices significantly reduces potential risks.
Final Thoughts
Building a WordPress website from scratch might seem intimidating before you begin.
But as you’ve seen throughout this guide, it’s really a series of small, manageable steps.
You don’t need to be a web developer.
You don’t need advanced technical knowledge.
And you certainly don’t need an expensive budget to get started.
What you do need is the willingness to learn, experiment, and keep improving.
Every successful website started exactly where you are today, with a single idea and an empty website.
Don’t wait until everything feels perfect.
Choose your domain, install WordPress, publish your first article, and continue learning as your website grows.
The sooner you start, the sooner you’ll gain experience.
And experience is one of the most valuable assets any website owner can have.
Continue Your Website-Building Journey
If you’re just getting started, these beginner-friendly guides on OrbitElf will help you take the next step:
- How to Start a Blog in 2026: The Complete Beginner’s Guide
- How to Choose a Blogging Niche That Makes Money
As OrbitElf grows, we’ll continue adding more tutorials on WordPress, web hosting, SEO, AI tools, and online business to help you build and grow your website with confidence.